My Blog has DXCC

One blog metric I have been watching since I noticed that I had a lot of international visitors is page views from other countries…today I logged on and noticed that I now have visits from over 100 countries.  Pretty cool!

Number Country Views
1 United States 20,819
2 United Kingdom 1,901
3 Germany 1,808
4 Canada 1,594
5 Italy 920
6 Netherlands 677
7 France 621
8 Australia 571
9 Switzerland 470
10 Japan 437
11 Sweden 381
12 Denmark 370
13 Norway 368
14 Spain 350
15 Belgium 320
16 Poland 307
17 Republic of Korea 257
18 Russian Federation 204
19 Austria 197
20 Slovenia 168
21 Czech Republic 160
22 Finland 149
23 Brazil 135
24 Israel 126
25 Slovakia 117
26 New Zealand 112
27 Portugal 104
28 Romania 99
29 India 95
30 Malaysia 94
31 Greece 87
32 Hong Kong 81
33 Ireland 80
34 Guernsey 78
35 Taiwan 69
36 Ukraine 56
37 Thailand 55
38 Hungary 54
39 Chile 44
40 Estonia 41
41 Croatia 41
42 Indonesia 36
43 South Africa 29
44 Argentina 29
45 Lithuania 26
46 Bosnia and Herzegovina 26
47 Serbia 23
48 Bulgaria 23
49 Turkey 22
50 Mexico 20
51 Puerto Rico 20
52 Luxembourg 18
53 Singapore 15
54 Philippines 14
55 Qatar 13
56 Kuwait 12
57 Moldova 11
58 Panama 11
59 Faroe Islands 9
60 Ecuador 8
61 Isle of Man 8
62 Cyprus 7
63 Greenland 7
64 Venezuela 7
65 Saudi Arabia 7
66 Belarus 7
67 China 6
68 Macao 6
69 Colombia 6
70 United Arab Emirates 5
71 Dominican Republic 5
72 Jersey 4
73 Costa Rica 4
74 Barbados 4
75 Latvia 3
76 Guadeloupe 2
77 Algeria 2
78 Kazakhstan 2
79 Ethiopia 2
80 Falkland Islands (Malvinas) 2
81 Lebanon 2
82 Cayman Islands 2
83 Malta 2
84 Oman 2
85 Iceland 2
86 Solomon Islands 2
87 Paraguay 2
88 Sudan 2
89 Sri Lanka 1
90 Bangladesh 1
91 Trinidad and Tobago 1
92 Egypt 1
93 Libya 1
94 Virgin Islands 1
95 United Republic of Tanzania 1
96 Réunion 1
97 Albania 1
98 Mauritius 1
99 New Caledonia 1
100 Belize 1
101 Suriname 1

 Total Page Views

K4NHW’s Antenna Project

Nathan, K4NHW decided he needed a new HF antenna so he picked up a fan dipole and decided to throw an antenna raising party. Here are a few images of Saturday’s fun. I probably should gave taken more images of the event (like the great food) but glad I have these few.

Here is Nathan intently wrapping his coax/connectors on the center insulator:
20140427-092947.jpg

Look at this professional finish (it’s too bad I didn’t take a photo of the strain relief solution that Nathan devised):
20140427-092958.jpg

John, N4DOU, and Nathan working on the window patch panel (Nathan had to replace the barrel connectors as they may have been damaged due to exposure to moisture).
20140427-093019.jpg

Connecting the new coax…sorry no photos on the hack job I did soldering the first PL-259 (it’s been a few years):
20140427-093029.jpg

Checking SWR…turns out that most bands were really good…a few were a little higher but well within limits of Nathan’s tuner:
20140427-093037.jpg

Nathan sent me this note early Sunday morning and mentioned the following:
“For the real success story, after I took the original wire antenna down that was directly over the back side of the house, the wife and I went out to the back patio and sat in the swing. I asked her what she thought of the new antenna. She looked up a bit and said “What antenna?”. That was good enough for me. After I pointed out the apex and the legs, she then noticed the coax hanging down directly behind her. She said… “I’m fine with that. Now we just need to get rid of all of that junk on top of the house.” as she pointed to the 10m vertical and 2 meter j-pole and scanner antenna. I’m ok with that for right now. “

Random Wire Antenna with Ground Radial System (inverted “L”)

Over the last two weeks I have been putting together a ground counterpoise system to go along with my random length antenna (see original post).

I started with a basic radial plate (DX Engineering) and purchased a kit that included 500ft of wire and various hardware for 20 radials.

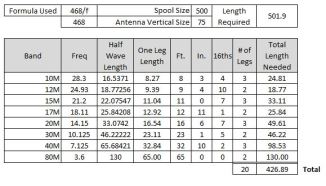
To get started…I decided to build myself a quick spreadsheet to determine the lengths of radials I wanted, per band, and to determine if I had enough wire to finish the job. This is what I ended up with:

Excel File

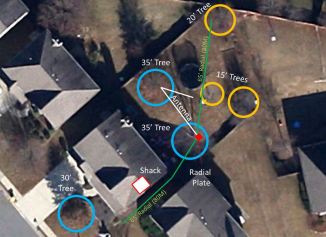
With a little bit of planning, I determined that I could get my longest radials nearly 180° from each other off my radial plate if I ran one radial to the back corner and took the other radial down the side of my house. Furthermore, I believed that I could achieve the most vertical height out of my antenna if I placed my radial plate directly near the base of the tree (nearest to my shack). My basic design is as following (not all details about antenna and radials are shown):

HouseOverview

Building the radials went rather quickly using the fancy wire strippers I also ordered from DX Engineering. I made the mistake of thinking this would take me the longest amount of time…cause once I got outside…it took me forever to get the lines laid out and then bolted/staked into place. I started with the longest wires first then worked my way “up the bands” to the shortest wires trying to get them more evenly distributed around fences, trees, decks, garden, and the trampoline. It was at this point that my wife began wonder if I was building a set of electrified “trip wires” to take out my kids and pets :).

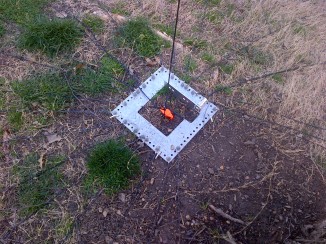
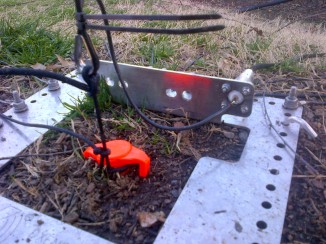
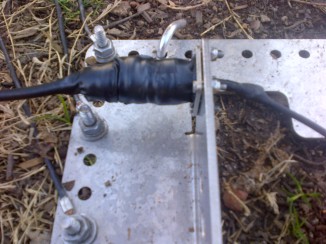
My radial plate looks like this (see below). Pay attention to the wire strain relief and camping stakes (used to hold the base plate in place…four aluminum on the sides, and one orange in the center).

Acworth-Kennesaw-20140308-00133Acworth-Kennesaw-20140308-00132

NOW TO WORK ON THE RANDOM LENGTH WIRE ANTENNA

With 75ft of wire left on the spool, after building the radials, I had the perfect length for 8 bands length I was shooting for (see purple in diagram).

Shooting lines through the first tree was the most challenging part because I had a certain path I wanted the wire to exit at the top of the tree (where the wire goes from vertical to horizontal towards the neighbor tree). I must have made 20 shoots with the slingshot to make it. It actually took two precise shots…one for the rope to pull up the isolator used to make the turn from vertical to horizontal (this one was easy) and one to make the path for the wire antenna (this is the one that took multiple tries).

To illustrate the path…starting from the at the far end of the random wire I attached isolator and connected it via rope to a heavy duty bungee cord.
EndAntenna

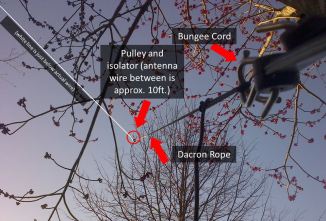
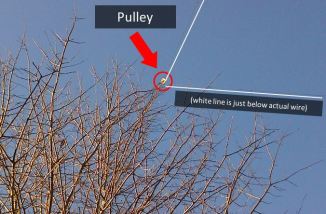
I then routed it to a plastic clothesline pulley I found at Home Depot.
pulley

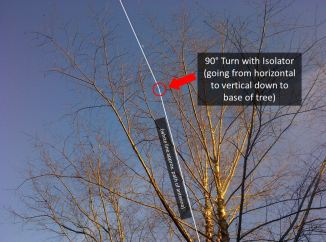
Here is the last turn (not illustrated good here but you get the idea).
Antenna Vertical

Lastly…I placed coax seal around the connection point (using electrical tape first, then coax seal, then more electrical tape…it looks ugly because I had issues going underneath…it wasn’t neat…but will get the job done.
Acworth-Kennesaw-20140308-00139

HOW DOES IT WORK?

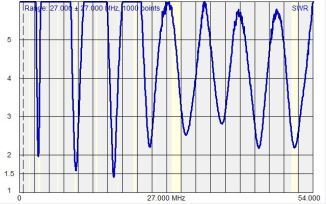
Here is plot showing the full range from 0 to 54Mhz. You will notice a number of dips in the SWR (this scale only goes up to 6) in the plot (yellow areas approx. the amatuer radio band plans). In some cases this is good…in others…not so good.
Full Range

80M was a surprise:
80M

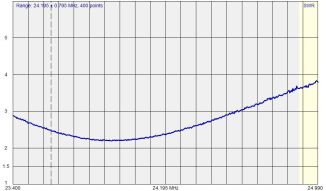
12M, 17M, and 30M did not look to bad either:
12M

17M

30M

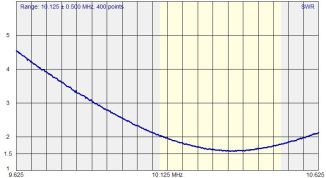
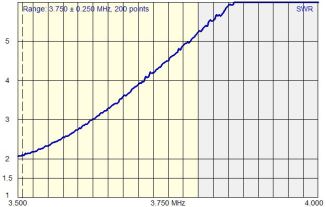
However, when I took a closer look at 20M and 40M I noticed that they were not doing well (my areas of improvement):
multibandswr

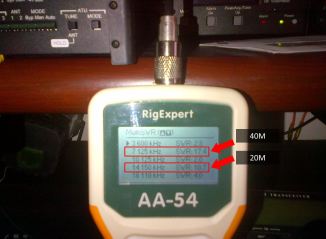
Thankfully the tuner on my KXPA100 (the KX3 AMP) tunes them to down around 1.2 or so so I should be able to work with those bands until I can figure out some changes to experiment with.

All in all…I am happy so far with the antenna progress. Now to see if works better than the attic dipole that I have.

FT5ZM – Amsterdam Island (11,400+ miles away)

After trying to work them for 3 or 4 days I finally broke through yesterday and made a clean contact on 20M CW. They were very strong yesterday and pile up wasn’t too bad so it only took about 30 minutes to work them.

My first contact was a bust and likely went to K4TX (I even sent him an email to see if he was trying to work them).

I am very glad my 100W amp came in time to work them. I definitely wanted to use all that power to make the contact (to make up for the “compromise” fan dipole in my attic).

20140209-163305.jpg

Win4K3suite – KX3

About a month ago I read on the KX3 Yahoo group about new software called Win4K3suite.  During the holidays I decided to give the 30 day trial a go.

Here is a great video overview provided by the software’s designer Tom, VA2FSQ.

Download, execution, and setup are pretty straightforward.  Tom has a two great video tutorials to help a new user set up the KX3 Spectrum Scope and any 3rd party products (like N1MM and LOG4OM).

Be sure to use the latest Kx3 firmware version.  I had an error using beta firmware that was easily resolved moving back production firmware.  Tom, who has been very responsive to my questions, mentioned that there have been issues with old firmware as well.

Once the software is setup it works.  To be more precise it works very well!  Personally I am a big fan of simple software like this that is easy to setup and just works well.

The Control Center Window has a great layout.  It really feels like you have full control of the KX3.  There is even a “SPOT” button in the menu (and it actually works).  

Win4K3_Control

The spectrum scope is nice.  It is a bit different from what I am used to with NaP3/PowerSDR in terms of looks and function.  The scope is in a separate window…which can be very nice if you have two screens…but you may have problems fitting both on one screen (without any overlapping windows).  I also found that I cannot keep just the spectrum scope up if I close the control center window.  Point click tuning, the most important feature in any panadapter, works well (accomplished by a double click).   The spectrum scope always seems to be correct when I switch modes, etc (not like the issue that I have with NaP3).  Having had a Flexradio for a number of years I do notice a few things missing…the first is the on screen adjustable filtering that you can do NaP3/PowerSDR.  Second, I miss the great mouse controls to move through the spectrum scope easily.  Lastly, I really do enjoy the Panafall/Spanafall  “look” with NaP3/PowerSDR (with AVG turned on).  This scope feels a bit more bland.  Overall, the Win4K3 Spectrum Scope is different (not worse)…so it may just take me some time to get used to it.  I believe that Elecraft Owners with a P3 will enjoy it.  

Win4K3_Spectrum

Tom tells me that the panadapter is new (version 1.0) so there may be additional improvements once he had heard more feedback from beta testers.

Setup with 3rd party software is also pretty straightforward.  In this case, I simply used a pair of virtual ports (Com4 and Com5) I previously set up in com0com to connect N1MM to Win4K3.    There really isn’t too much else to it.

Win4K3Setup1

Conclusion:

Overall this program works very well and I would suggest that everyone give it a try (30 day trial) to see if it will work for them.   The software costs, $50, is well worth it if the software has a permanent place in your shack.

PROS:  Easy setup, clean layout, great rig control, and responsive service (with Tom)

CONS:  If you are a PowerSDR/NaP3 user the spectrum scope will take some time getting used to.  Its not bad…just different.

KXBC3 – Notes

Today I was reading the KX3 Yahoo Group messages and came accross a conversation regarding the optional internal battery charger on the KX3.

Here are some notes I wanted to remember so I figured I would post them here (my thanks to Mark, KE6BB for his original response to the KX3 Yahoo Group):

  • There is a temperature protection feature in the KXBC3 that will display a message of “NOT 0-40C” if the cells go above the maximum specified temperature.
  • If the “NOT 0-40C” message appears during a charging cycle…then the charging cycle will resume once the condition is corrected (it is not known if that includes just letting the batteries cool down).
  • If using the recommended > 1900mA NiMH batteries it would be difficult to over charge these batteries using the KXBC3 (based on the constant charge rate and temperature protection)
  • If using modern NiMH batteries then there is no need to fully charge or fully discharge them to reduce memory effect.
  • Going to 100% occasionally is a good idea since that helps level out the voltages of individual cells
  • Never let the cells’ voltages drop below about 1v per cell (cell damage may occur and potentially the KXBC3 will not start its charge cycle)
  • Lastly, it is good practice to occasionaly check the voltage of each battery, after a good charging, to see if they are still with a few tenths of each other

The KX3 will turn itself off at 7.5V (or 7.0V depending on where you see it in the KX3 manual) so you will likely not run into the risk of going damaging the cells due to low voltage.

KXBC3 Manual is here

Here is more on the errors messages related to the KXBC3 (see image below):

KXBC3

KXPA100 Order Number to Date Converter

Having recently ordered a KXPA100 I have begun to take notice of order confirmations that others post to the KX3 yahoo group. I plan to use these as a gauge for when I might receive my amp.

Today, somebody posted their order number as: 2285-8685-3232

A quick way to see when they ordered is to go to Thomas’s (M0TRN) website here.

20131203-160031.jpg

I guess I have a ways to go before I get mine…

KX3 – Trouble Shooting NaP3 – Sampling Rate Error

It has been awhile since I have connected my KX3 to NaP3 so today I decided to give this a try.

When I connected…I noticed this (the signal did not show across the full bandwidth):
NaP3

I took a look at my settings…they looked fine (I like to keep mine at 96K).
NaP33

To investigate I selected 48K and then noticed that the signal went wide.
NaP31

Then when I selected 192K and noticed that the signal went really short:
NaP32

At this point I realized that I had connected the R/Q output into the back of my computer and that I needed to adjust the mic input.

NaP34a

I made the change and guess what…it worked.
NaP35

After all this…I then realized that I had originally configured the Line In jack on my computer…and had simply connected into the wrong jack (in this case the microphone).

Nevertheless, I hope this helps anyone else who encounters this same issue.

2013 CQ WW CW Contest

This weekend I had a few hours to play in the 2013 CQ WW CW Contest.

It was definitely a very fun contest.  I worked it for about 2 hours Saturday and worked 52 stations (which I feel by my standards is not too bad…see setup below).  I also thought that overall band conditions were quite good as well.

My setup was really modest with my KX3 set to 5 watts and a simple fan dipole (20M, 15M, and 10M) in the attic. I used N1MM (configured to send KY Codes) to key the radio and send my callsign and exchange.  Furthermore, I only worked stations whose CW signals the KX3 could mostly decode (I am still learning the code).

I decided I would start at the bottom of the band on 20M and work my way up (which I did) and then hit 15M if I had time (and I made a handful of contacts there).

Two notable contacts I made that I want to mention here:

Japan (JH1GEX – Yatuka) – This was the last contact I made in the contest.  He had a very strong signal and he came back to me after the first call.  I could tell he was keying by hand as his spacing was off slightly but the callsign was definitely mine.  At 6,880 miles away (according to QRZ)…I believe it would surely qualify for any of the QRP 1000 Miles per Watt awards.

NOTE:  One more thing…I always like to pull up the interesting countries I work on Google Maps/Earth and occasionally I like to plot out a path from my QTH to the DX Station.  I was very surprised to learn that my contact with JH1GEX was off the end of my dipoles!  See image far below.

Swaziland (3DA0ET – 2013 Swaziland DXpedition) – This was a surprise for me.  I had not expected to work any DXpeditions during the contest…but I heard these guys well and worked them easily.  I decided to look up the callsign on QRZ before I moved up the band.  The other thing I noticed is that these guys are about 8,642 miles away (according to QRZ).   Pretty happy about this one.  Plus, I am already confirmed in LOTW.  Yeah!

All in all this contest was a lot of fun for me.  I hope to be able to do this again next year.

Path (white line) of my contact with JH1GEX (Japan) relative to my dipole (which follows the roof line of my house).
Jh1gexPath